Glow Effect Tute
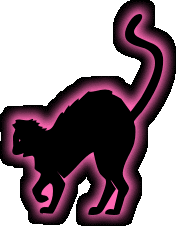
 .. this tutorial will be easy for people who are familiar with Image Magick and they may not even need to print out this page, merely just read it. I do not mind helping those that need help but PLEASE people if you do not even know what a link is, don't try to tackle this tutorial, it is way too far advanced for you. Having general knowledge of Image Magick is needed here (sorry). .. this effect can be easily done with any text (of course) but since it is a glow effect I thought halloween dingbats would be a great example. (plus it's my favorite holiday) Naturally there are many possibilities here, only your imagination limits you. ... you are going to make the cat image above the banner at the top of this page and start out with a black blank gif which you can pick up Here and a dingbat halloween file courtesy of Captain Raider's Font Repository Here (thanks Jon!) ... take your blank gif and the dingbat file to Net4's Image Magick, place the blank gif url in the field and click "view". .. at the top of the page click "Annotate" fill in the following fields ONLY Text: G (capital letter G only) Gravity: Center +0+0 Fill Color: hotpink Stroke Color: hotpink Pointsize: 200 Density: 90 Stroke Width: 10 add the dingbat font url to the field just under the gray font jumpbox and click "annotate" here is your result:

.. now at the top of the page click "Effects" set the options to: Parameter: 7.0x7.0 red radio button click blur* now press "effect" here is your result:

.. now at the top of the page click "Annotate" all the fields should be what you had before but if not fill them in again.. ONLY change the following fields Fill Color: #000000 (try different colors here later this can get awesome) Stroke Color: none Gravity: Center +0+2 (I change this slightly so it can be placed down a bit) now click "annotate" here is your result:

.. now you should be at the "view" stage at Image Magick, look at the top of the page and you'll see the view word white and all the rest of the buttons will be a slightly different color, if not, click "view" change the following options ONLY Paint Type: Matte Method: FloodFill delete the contents and leave it blank in these two fields Fill Color & Border Color .. now slightly tap your return key on your keyboard, you'll see a yellow highlight surrounding the image and an arrow show up in the middle.. move that arrow to the OUTSIDE black area closest to the edge of the image and click.. here is your result:
.. now if you want to trim off the excess around the image click "transform" at the top of the page .. the red radio button should already be on trim by default but if it isn't change it to trim* now click "transform"
.. a little tip here.. the outside edge is created by the Stroke WIDTH and blur* effect, the larger the stroke width and blur* number the wider the outline.. .. now at the top of the page click "Output", (when choosing a format for this type of effect remember it MUST stay a gif format to keep the transparent background.. jpgs CANNOT have transparent backgrounds!) click on "gif" inside the gray jumpbox for the format and click "output" click on the image and transload :-)) now wasn't that simple? ... good luck and have fun! ...
| ||||||